Thursday, 31 August 2017

Microsoft rolls out SMS Insights feature in Skype Lite

Microsoft on Thursday rolled out a new feature -- 'SMS Insights' in Skype Lite app that will help users organise text messages on smartphones.
     
The feature will help users to find all texts from financial institutions like account balance, credit cards, wallets and others at one place.

Microsoft on Thursday rolled out a new feature — ‘SMS Insights’ in Skype Lite app that will help users organise text messages on smartphones. Skype Lite, which was designed for Android users in India, will now have the capability to aggregate and present the SMS information at a glance and sort it into various categories, the company said in a statement. The ‘SMS Insights’ feature sorts the text messages into categories like finance, shopping, travel, reminders and promotions.
This will help users to find all texts from financial institutions like account balance, credit cards, wallets and others at one place. Similar classification will be done for other categories.
The new feature also offers relevant action links allowing users to pay bills, check-in to flights and call customer support numbers. It can be enabled by Skype Lite users after providing SMS permission to the app.
The company said the SMS classification and categorisation will happen locally on the phone and that the users’ SMS information will not read or stored.
In July, the company had rolled out Aadhaar integration feature with the Skype Lite app to prevent impersonation fraud, allowing users to verify the caller’s identity online.
Earlier this year, Microsoft threw a direct competition to social media apps like Google’s messaging app Allo and video calling app Duo, WhatsApp and Facebook Messenger, by launching Skype Lite to provide seamless experience in messaging, audio and video calling even at lower bandwidths. “Packed in a 13MB file (from its original 36 MB size), the new app was especially designed to save data,” Nadella had told the gathering.
The lightweight app supports several Indian languages including Gujarati, Bengali, Hindi, Marathi, Tamil, Telugu and Urdu.
How to Back Up SMS Messages on Your Android Phone


Highlights

  • Backing up SMS messages isn't a built-in feature on Android
  • You can back up your messages with third-party applications
  • SMS Backup and Restore is free and easy to use for this
If you're an Android user and need to delete the data on your phone, then you know that there are a number of good options for backing up your phone first. A lot of this can be done via the Cloud, so that the content can be brought back easily, but backing up your SMS inbox requires the use of third-party tools. There are a lot of different options on Google Play, but the question becomes which one should you use. Most of the popular ones require access to your Gmail account to automatically create and restore the backups, but if you aren't comfortable giving this kind of access, we have a good option you can try, which we used ourselves as well to backup SMS messages on our Android phone.
Here is everything you need to know about backing up (and restoring) your phone's SMS archive, which can be saved on the device, mailed to yourself, or saved to the cloud. This will be useful if you need to reset your phone to factory settings, or if you're switching to a new phone. We used SMS Backup and Restore, which was acquired by Carbonite a few years ago. Just follow these steps to backup SMS on your Android phone.

Creating a backup of your Android phone's SMS messages

To create a backup of all your SMS messages, you'll need to start by installing Carbonite SMS Backup and Restore on your phone. Once that's done, follow these steps:
  1. On the welcome screen, tap on Get Started.
  2. You'll have to grant access to files (to save the backup), contacts, SMS (obviously), and manage phone calls (to backup your call logs). Keep tapping Allow on all four pop-ups.
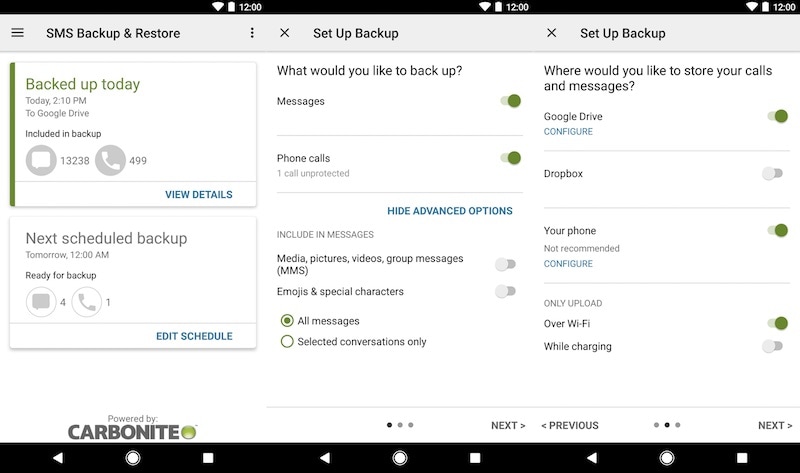
  3. Tap Set up a backup.
  4. Toggle phone calls off if you only want to back up your texts. You can also tap Advanced options if you want to back up MMSes or selected conversations; leave this alone if you want to back up your entire text archive.
  5. Tap Next.
  6. Now, using the toggles, select where you want to make the backup. You can choose Google Drive or Dropbox, but if you don't want to give access then you can turn on the toggle for Your phone, and then copy the file manually.
  7. If you're okay with the default folder tap on OK, otherwise tap on Browse and find the folder you want to save the backup in.
  8. Once that's done, tap on Next, and then in the popup, tap on Yes.
  9. You can either set a backup schedule from the toggles in front of you, or turn off the Schedule recurring backups toggle. Then, tap on Back Up Now.
                           sms backup restore app carbonite
That's it, the backup will now be carried out. With around 13,000 messages on our phone, the process took under three minutes. Once you have the backup file, you can copy it to your PC, or save it to the cloud manually, without linking your apps to a third-party software.

Restoring a backup of your Android phone's SMS messages

After you've created a backup of your Android phone’s SMS messages, you can go ahead and reset the phone, either because you want to try and free up space, or because you're moving to a new phone. Now that you've made the backup though, what do you do next? Once again, you'll need to install Carbonite SMS Backup and Restore either on your new phone, or your newly formatted phone. Once that's done, follow these steps to restore SMS messages:
  1. Ensure that the SMS backup is copied to your phone.
  2. Start Carbonite SMS Backup and Restore and tap Get Started on the welcome screen.
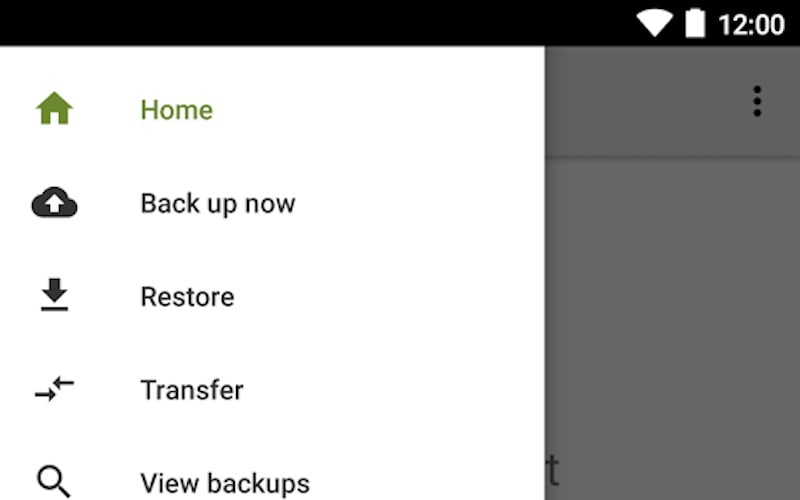
  3. Tap the hamburger menu icon on the top left, and tap on Restore.
  4. Tap on Local backup location if you are using a local copy, or if you chose to use Google Drive or Dropbox, tap on the appropriate button.
  5. It should find the latest backup automatically, but if it does not, tap on Select another backup, and tap on the file you want to restore from. Choose from the toggles to decide what you want to restore, messages, and phone calls.
  6. Tap on Restore, and then OK, and Yes on the next two popups to get started.
                         sms backup restoring carbonite
That's all there is to it. The app restores all your messages, so you can pick up where you left off even if you're switching to a new phone. And if you're backing up your existing device, it is also checking for duplicates so as to not flood your inbox with copies. The process not quite as fast as backing up the messages. Restoring around 13,000 messages took around five minutes.
Once that's done, you're good to go and can uninstall the app if you want to, or if you want to schedule regular backups, that is also an option available to you. Since the app needs to be the default SMS application for restoring messages, you'll want to go to your SMS application and open it to make it the default again, but other than that, there's nothing else you need to do.

Wednesday, 30 August 2017

Decoded: Turning your smartphone into a smart car key


When the Frankfurt International auto show opens its doors to the public on September 14, leading automotive equipment and tech provider Bosch will be demonstrating a new digital feature called Perfectly Keyless, that can turn any driver's smartphone into a hands-free car key for opening and closing doors.
"Perfectly Keyless, our digital vehicle access system, means that drivers will be able to do without traditional car keys. It's a great example of stress-free connected mobility," explained Harald Kröger, president of the Bosch Automotive Electronics division.
The system is simple and secure, requiring a sensor fitted to the car that can wirelessly connect to an individual phone for identification. The user doesn't even need to take the phone out of his or her pocket. "Once this identification has happened, the vehicle is unlocked without any need for a physical key. Similarly, no key is needed to start the engine or to lock the car again at the end of a journey," said Kröger.
In recent years, carmakers have been embracing the possibilities of the smartphone, whether as a tool for programming a vehicle's navigation system, or for remotely checking its location, its fuel reserves or, in the case of electric cars, the amount of charge remaining in the battery packs. In the case of Mercedes, BMW and Audi, your handset can even be used to remotely park or summon the car.
However, as Bosch is an industry-wide global supplier, its system can be adopted by any car company in the world and all a driver will need to take advantage of it is to install the supporting app.
And, if a car has several drivers, when the smartphone connection is made, the car can also automatically adjust settings, such as seat and mirror positions and radio stations, in line with that driver's preferences.
The system is also future-facing. With the growing popularity of peer-to-peer car rental services, Perfectly Keyless can be used to enable other people to access a person's car (with their permission) without having to use car keys. What's more, the app allows drivers to set a time limit and geographical boundaries for another user's key -- something that could be just as effective for parents worried about their teenage children's driving habits.
And as innovative as Perfectly Keyless sounds, so far, the best alternative digital key system is Jaguar Land Rover's Activity Key. It's a slim waterproof wristband that doesn't require a battery and which will automatically lock and unlock a car. The idea behind the device is that many drivers, especially those of proper SUVs want to head out on adventures and leave their valuables securely locked in the car -- including the car keys and their smartphone. As long as they're wearing the band, the traditional key fob and any access apps on their phones are automatically disabled.
The 2017 Frankfurt auto show opens to the press on September 12 and to the public from September 14-24.

MediaTek vs Qualcomm: Which smartphone processor should you choose?

How exactly does MediaTek processors differ from Qualcomm's ? Read through to find out.
                        
MediaTek vs Qualcomm: Which smartphone processor should you choose?
A smartphone processor, today, is way more powerful thanwhat we think. A System on Chip (SoC) which can be as small as a coin does wonder when combined with adequate software. When we talk about smartphone processors, two names which have largely dominated are Mediatek and Qualcomm. While Qualcomm is more famous in the United States and Europe, MediaTek has slowly captured a relatively larger market share in South Asian markets. However, what exactly are the factors which make processors from these two manufacturers different and unique in their own sense? Let’s find out today.
Origin
First things first. Qualcomm which is based out of United States has been in the business for way longer than Mediatek. For instance, the American company was founded in 1985 where it initially produced a satellite locating and messaging service called OmniTRACS. The first Snapdragon processor was launched in 2005 when smartphones were yet to make any major impact. On the other hand, MediaTek which is a Taiwanese company was founded in 1997 where it first began to manufacture chipsets for DVD, digital TVs etc. So, Qualcomm already had a big head start way ahead of MediaTek.
Cheap vs Expensive
However, one problem with Qualcomm processor was that they were a bit too expensive for OEMs (Original Equipment Manufacturers) to blend into their smartphones and yet sell them at lower prices. This is where MediaTek targeted and brought in its relatively cheaper range of processors. Chinese smartphone manufacturers soon spotted the potential and started manufacturing smartphones based on MediaTek processors. There was the time when a flood of budget MediaTek based smartphones hit the Indian shore. Qualcomm, on the other hand, was still the king when mid range or flagship smartphones came into the picture.
More Cores vs Better Efficiency
Another battle which has been lighting up pretty quickly between these companies is Power vs Efficiency. While most of the chipsets from MediaTek focus on more power, Qualcomm chipsets are more about efficiency. This is why smartphones, and especially budget smartphones running MediaTek processors would easily outgun the ones running its Qualcomm equivalent. However, a lot of times more power in MediaTek processors came with the unnecessary compromise on battery life and overheating issues.
CPU and GPU
A notable difference which plays a crucial role if you are a graphic intensive user is GPU. Both the companies use a different set of GPUs (Graphic Processing Unit) with their range of advantages and disadvantages. MediaTek processors are generally coupled with Mali GPU which is produced by ARM while Qualcomm combines in its Adreno lineup of GPUs. Now, this is where things get interesting. Mali GPUs are in no way inferior to Adreno. However, they are easier to develop games on and hence, developers always dive in for Adreno GPUs. Further, if you are into Rooting, or getting root access of your device, the number of developers hanging around for a Qualcomm processor-based smartphone will be much more than MediaTek’s.
So which one should you go for?
Well, to answer this question, you will need to sort out your preferences. If you are going for a budget device and want no compromise on power, MediaTek chipsets will surely serve you better. On the other hand, if you are someone who wants an overall efficiency and better developer support, Qualcomm’s Snapdragon range of chipsets wins it any day. Besides, given the record, we would still recommend you to opt for Qualcomm here because MediaTek has often runs into trouble with optimisation and poor handling of the overall process in quest of more power.

Monday, 28 August 2017

What is the Difference between 32-Bit and 64-Bit Processors?

                              
There are many things to consider when buying a new Computer. We look for RAM size, Processor, CPU, GPU, Hard Disk and display etc. But when it comes to select a Processor’s category, we prefer 64-bit Processor. In fact, Most people want 64-bit Processor PC without even knowing what does it mean to have 64-bit Processor and What is the Difference between 32-Bit and 64-Bit Processors?.
It’s good to have knowledge of many terms which are used daily but people don’t give much attention. In this article, let’s discuss 32-Bit and 64-Bit Processors and what does it mean for your PC.

Difference between 32-Bit and 64-Bit Processors

Whenever you buy an operating system, a software or a game, you probably see 32-bit and 64-bit options available. If you’re a Windows user, you must have noticed that you have two Program Files folders — one simply “Program Files” and the other labeled “Program Files (x86).” This “Program Files” folder is used for storing the DLL files of 64-bit applications only. The x86 folder is used for storing the DLL files of 32-bit applications.
To install a 64-bit version of Windows, you need a CPU that’s capable of running a 64-bit version of Windows. The benefits of using a 64-bit operating system are most apparent when you have a large amount of random access memory (RAM) installed on your computer, typically 4 GB of RAM or more.


In such cases, because a 64-bit operating system can handle large amounts of memory more efficiently than a 32-bit operating system, a 64-bit system can be more responsive when running several programs at the same time and switch between them frequently.
A computer with a 64-bit processor can have a 64-bit or 32-bit version of an operating system installed.

However, with a 32-bit operating system, the 64-bit processor would not run at its full capability.
How can 64-bit Processor handle more RAM?
The computer system only supports binary counting. There is either 0 or 1. Each one is a considered a “bit.” That means for 1-bit computing, you get two possible values; 2-bit means four values; then at 3 bits, you double that to eight (2³).
Keep going exponentially and you eventually get 32-bit (2 to the 32nd power) worth 4,294,967,296 and 64-bit (or 2 to the 64th power) is worth 18,446,744,073,709,551,616 values.
That’s a lot of bits, and the numbers show just how much more powerful a chip that supports higher bit computing can be. It’s a lot more than double. So It’s pretty obvious that 64-bit processor is capable of doing more computing than 32-bit.
These days, you are most likely already running 64-bit chips with 64-bit operating systems, which in turn run 64-bit apps (for mobile) or programs (on the desktop, to settle on some nomenclature). But not always. Windows 7, 8, 8.1, and 10 all came in 32-bit or 64-bit versions

5 Very Useful Websites For Internet Users


Nowadays everyone browsing the Internet. To know anything, its information is easily found by Google. There are millions of such websites available on the Internet which can be used daily.
At the same time, there are some websites that many people do not know about, but these websites can prove to be very helpful. In this post we are going to tell you about 5 such websites.
Radio Garden
Through this website, all live radios from around the world can be heard.
Flight Radar
Through this website, users can track all the world's flights.
Internet Map
Through this, any web site's ranking can be seen. Every website on the same page will be shown according to ranking.
Norse
Through this website, users can get information about real time hacking attacks.
Faces of Facebook
The faces of all the people who use Facebook will appear on this website. Also, a link to their profile will also be given on that face.

Sunday, 27 August 2017

If the Facebook account has been hacked, try these tips and tricks


Facebook social media is currently being used in the whole world. According to media sources, many Facebook account remains hacked every day. The main reason for which is ignorance of the user.
These things that you are told to do so after the Facebook account is hacked. You can get back your Facebook account. Follow the steps described below to learn it.
- Follow the URL you are told when a Facebook account is hacked. https://www.facebook.com/hacked
- By entering, click on the new message 'My account is compromised', now enter your old password by entering your username, email ID, and mobile number.
- You can tell, sometimes the email ID is changed on the Facebook account by the hacker. In such a situation, instead of giving an email ID to password reset, instead of entering the mobile number, click the reset link.
-Enter a new password. After this, you can get your Facebook account back again.

15 Important Run Commands Every Windows User Should Know

There are several ways to efficiently access the files, folders, and programs in Windows operating system. We can create shortcuts, pin programs to the taskbar, Start menu shortcuts etc. but we can’t do it for all programs in many cases. However, the Windows Run Command box is one of the most efficient ways of accessing system programs, folders, and settings.
In this article, I am going to share 15 most important Run commands for Windows users. These commands can make it easier to manage a lot of tasks.

Copyright Holder

How to open Windows Run command box?
You need to press Win+R (Hold Windows button then Press R)
<h2>Important Run Commands Every Windows User Should Know</h2>
1. %temp%
This is the fastest way to clear the temporary files from your computer. It can save a lot of space which was being wasted by temporary files.
2. cmd 
This command will open the windows DOS command prompt. Windows command prompt is very useful for performing many tasks which are not possible using graphical user interface.
3. MSConfig This command will open Windows System Configuration where you can edit different things like the boot options, startup options, services, etc.
4. sysdm.cpl This command will open the System Properties window, Where you can change the system protection and performance related many settings
5. Powershell
Powershell is very similar the command prompt. Just type this command in the Run dialog box, and you will have your PowerShell opened without administrator privileges.
6. perfmon.msc This command can be used to monitor the performance of your computer. There are plenty of options for monitoring the system performance
7. regedit
Regedit Run command is used to open the Windows Registry. It is a hierarchical database that hosts all the configurations and settings of Windows operating system, it’s users and the installed software.
8. \ (Backslash)
This is one of the lesser known Run commands. Just enter the backslash into the Run dialog box and it will open up the C drive. It is one of the quickest ways to access the C drive.
9. . (Dot)
This is yet another lesser known Run command. When executed, it opens the current user’s home folder which hosts all the other local folders like the Downloads, Documents, Desktop, Pictures, etc.
10. .. (Double Dots)
When you execute these two dots in the Run dialog box, it will open up the Users folder which is located directly on the C drive.
Also Read: 10 Most Common Windows 10 Problems and how to fix them
11. Control
This command will open the control panel. Control panel is used for managing all the system settings and programs
12. hdwwiz.cpl This command is used to open the Device Manager in Windows. You can manage all the device connected internally or externally to your PC.
13. Notepad
The quickest way to open notepad in Windows. Just type this command in Run Box and hit enter.
14. osk
This command will open On-Screen Keyboard on your display monitor. You can easily touch and type or use your mouse for typing.
15. taskmgr  This command will open task manager where you can manage all the processes and programs running on Windows Operating system.

List of all the smartphones availing Android 8.0 Oreo update

People looking forward to update their Operating system are puzzled with the question whether their device will be upgraded to Android O.

New Delhi: Recently, Google released the brand new version of Android namely Android 8.0 Oreo (Android O). People looking forward to update their Operating System are puzzled with the question whether their device will be upgraded to Android O or not.
Here we have brought a list of smartphones that will avail the perks of Android Oreo.
Google

  • Pixel
  • Pixel XL
  • Nexus 5X
  • Nexus 6P
  • Nexus Player
Samsung

  • Galaxy S8
  • Galaxy S8+
  • Galaxy S7
  • Galaxy S7 Edge
  • Galaxy Note 7 Fan Edition
  • Galaxy A7 2017
  • Galaxy A5 2017
  • Galaxy A3 2017
  • Galaxy J7 2017
  • Galaxy J7 Prime
  • Galaxy J5 2017
  • Galaxy Tab S3
  • Galaxy C9 Pro
HTC

  • HTC U11
  • HTC U Ultra
  • HTC U Play
  • HTC 10
  • HTC 10 Evo
OnePlus

  • OnePlus 5
  • OnePlus 3T
  • OnePlus 3
Motorola

  • Moto Z2 (2017)
  • Moto Z2 Play
  • Moto Z Play
  • Moto Z Force
  • Moto Z 
  • Moto G5 Plus
  • Moto G5
Nokia

  • Nokia 8
  • Nokia 6
  • Nokia 5
  • Nokia 3
Xiaomi

  • Mi Max 2
  • Mi Max 
  • Mi 5X
  • Mi 6
  • Mi 5C
  • Redmi Note 5A 
LG

  • G6
  • G5
  • V20
  • Q8
  • Q6
Asus

  • ZenFone 4 (ZE554KL)
  • ZenFone 4 Max (ZC520KL)
  • ZenFone 4 Max Pro (ZC554KL)
  • ZenFone 4 Selfie (ZD553KL)
  • ZenFone 4 Selfie Pro (ZD552KL)
  • ZenFone Pro (ZS551KL)
  • Zenfone Go (ZB552KL)
  • Zenfone Live (ZB501KL)
  • Zenfone 3s Max
  • Zenfone AR
  • Zenfone 3 Zoom
  • Zenfone 3 Max
  • Zenfone 3 Deluxe 5.5
  • Zenfone 3 
  • Zenfone 3 Ultra
Sony

@sonyxperia
  • Xperia XZ Premium
  • Xperia XZ
  • Xperia XA
  • Xperia XA Ultra
  • Xperia XZS
  • Xperia X Performance
  • Xperia L1
Yu

  • Yunique 2
  • Yureka Black
  • Yureka S
  • Yureka Note
  • Yunicorn
Vivo
  

Representational Image
  • X9 Plus
  • X9
Oppo

  • F3 Plus
  • R11
  • R11 Plus
Huawei
                              

  • Honor 8 Pro
  • P10 Plus
  • P10 
  • P10 Lite
  • Mate 9
  • P8 Lite
Smartron
 

  • Srt.phone
  • t.phone
The new OS is faster than `Nougat`. People now get started on their favorite tasks more quickly with 2x the boot speed when powering up boot time (as measured on Google Pixel).
Android Oreo helps minimize background activity in the apps you use least.With your permission, Autofill remembers your logins to get you into your favorite apps at supersonic speed. It allows you to see two apps at once. It has made copy-paste job easier.
A user would just need to long press or double-tap anywhere on the text to select it. This feature keeps your device and data safe from misbehaving apps by scanning over 50 billion apps per day, even the ones you haven't installed yet! It auto-connects a the phone to a high quality open Wi-Fi and secures the connection with a VPN back to Google.

Saturday, 26 August 2017

Apps to ease financial burden


Tap to load
Is it that time of age when the concept of ‘savings’ dawns to you? When we find taxes and jargons way too taxing themselves. When savings don’t happen in plenty but scanty! When scoring the best deal itself gets to be the biggest deal. Here are five apps that will help families make better choices and save the most.

MySmartPrice
A simple way to compare product prices and offers from different websites, MySmartPrice shows rates and discounts of a product from different websites on one screen. It tracks an impressive 30 e-commerce websites for the best prices. MySmartPrice saves you money on all your online shopping. It is a price comparison engine that scans over 100 online shopping sites to get you the best price.

NoBroker
This is a one-stop shop while seeking a house on rent without paying on any broker fees or security. The app helps home seekers connect with house owners directly and you can choose them as per your choices.
Additionally, the app has a feature of click and earn click & earn’ is beneficial for the customers those who surf for properties by accessing it through mobile app. All one has to do in the ‘click n earn' feature is click the photo of a ' To-Let' board, send it to them through mobile app and get cash awards for every successful listing.
A user can earn Rs 100/- per verified listing with no upper limit on number of listings. This has never been done anywhere before by any online player in the world, also helps the company in ‘crowdsourcing’ of owner listings.

ClearTax
ClearTax allows you to check your Income Tax e-filing refund status. You can also calculate your total Income Tax liability with their tax calculator (as per the new Budget) and find out how much tax you can save by investing.

DesiDime
DesiDime Coupons & Deals App is a one-stop destination to get latest offers from over 500 shopping websites in India. With a powerful online community of over two lakh shoppers posting, reviewing and rating the offers from various e-commerce stores, they bring the latest, active and often hidden deals and coupons.

Paytm
With this app, Paytm Gold can be bought for as low as Re 1. The e-wallet company has sold over 175kg gold on its platform since the launch of the service in April 2017. It has partnered with government-promoted precious metal processing facility MMTC-PAMP and is paving way to become the choice of lakhs of Indian consumers. Using their Paytm mobile wallets, consumers can purchase 24K 999.9 purity gold online and store it in vaults free of charge.

How to use Outlook Groups and tasks to collaborate more effectively


Outlook can bring teams together in ways well beyond replying to an email. Here's how you can start to collaborate more effectively.
As well as you may think your team or colleagues produce and exceed, there's always room for growth. Outlook 2016 has a few features available that can help centralize your team communication, tracking, scheduling, and resources. Here is how you can get started.

What are Groups in Outlook?


Outlook 2016 taps into the Groups feature of Office 365. It gives users a shared place where teams can work and collaborate. Not to be confused with a distribution list, this group is truly a means to see how all pieces contribute towards a common goal. You have a shared inbox, calendar, and even a document library. Even without groups, you can still manage projects through tasks.

Managing Groups and assigned tasks in Outlook

How to create a group task


To create a Group task:
  1. Click the Home tab in the navigation ribbon.
  2. Click on New Items in the New group.
  3. Select Task from the dropdown list.
  4. Enter in details of the task, including due dates, reminders, and priority.
  5. Click Save & Close to create the task.
  6. Click on Tasks in the navigation pane.
  7. Select Folder tab in the navigation ribbon of the Task window.
  8. Select Share Tasks in the Share group.
  9. Select recipient(s) or a distribution group.
  10. Select or deselect the Request permission to view recipient's Tasks folder option.
  11. Select or deselect the Allow recipient to view your Tasks folder option.
  12. Click Send.

How to open shared tasks

To open your shared tasks:
  1. Click on Tasks in the navigation pane.
  2. Click the Folder tab in the navigation ribbon.
  3. Click Open Shared Tasks in the Share group.
  4. Click Name in the name dialog box.
  5. Find the name of the person in the address list.
  6. Click OK to return to the name dialog box.
  7. Click OK to accept.
It is possible to send a shared task access request to an individual if they have yet to grant you permission. If you choose to send a request, the recipient will receive an email, which also includes an option to have your default tasks folder shared with them.

How to remove a shared task folder

To delete a folder:
  1. Select Tasks from the navigation pane.
  2. Select the task folder under the "My Tasks" list.
  3. Select the Folder tab from the navigation ribbon.
  4. Click on Delete Folder in the Actions group.
  5. Click Yes to confirm.

How to assign a task


To assign a task to an individual:
  1. Click on Tasks in the navigation pane.
  2. Click New Task in the New section of the Home tab.
  3. Click on the Task tab in the navigation ribbon.
  4. Select Assign Task in the Manage Task group.
  5. Enter the recipient's name or email address in the To field.
  6. Fill out the subject, due or start date, status and priority fields.
  7. Ensure the checkbox for Keep an updated copy of this task on my task list is checked.
  8. Ensure the check box for Send me a status report when this task is complete is checked.
  9. Click Send.

How to accept or decline a task

To accept or reject a task:
  1. Open the task.
  2. Click on the Task tab in the navigation menu.
  3. Choose Accept or Decline in the Manage Task group.
  4. Choose to send your response now or edit the response first.
  5. Click Send.

How to see the status

To track the status automatically:
  1. Click on the File tab in the navigation ribbon.
  2. Click Options.
  3. Click Tasks in the left pane in the Outlook options window.
  4. Select the check box for the Set reminders on tasks with due dates option.
  5. Choose a reminder time.
  6. Select the check box for the Keep my task list updated with copies of tasks I assign to other people option.
  7. Click OK.
To manually view the status of assigned tasks:
  1. Click on Tasks in the navigation pane.
  2. Click the View tab in the navigation ribbon.
  3. Click Change View in the current view group.
  4. Click Assigned.


Getting started with Groups in Outlook

How to create a Group in Outlook 2016

To create a Group:
  1. Click on the Home tab in the navigation ribbon.
  2. Select New Group in the Groups section.
  3. Enter a name for the Group in the Choose a name field.
  4. Enter in a Group ID in the Group ID field.
  5. Select Public or Private as the privacy level for the group.
  6. Select a classification for the group.
  7. Select or deselect the check box for the group conversation notification to appear in the inbox for each member.
  8. Click OK.
  9. Select members of your organization to add.
  10. Choose a photo to represent the group.
  11. Enter a description for the group to help others understand the purpose of it.
  12. Click OK to finish.

How to delete an Outlook Group

To delete a Group:
  1. Select the Group in the Groups section of the left navigation bar.
  2. Select Edit Group.
  3. Select Delete Group.
  4. Select the check box for the I understand that the Group will be permanently deleted warning.
  5. Click OK to confirm and delete.

How to add a member to an Outlook Group

To add a member:
  1. Select the Group from the left navigation bar.
  2. Select Add members.
  3. Enter the name of the individual to be added.
  4. Click OK.
Adding an external user to the group is the same process as adding a member. You will be warned that the guest will have access to the content of your group. They will receive calendar items and group conversations in their inboxes, but they will have limits placed on their access including contact cards for group members or the list of group members.

How to remove an Outlook Group member

To remove a group member:
  1. Click on the Group in the left navigation bar.
  2. Select Edit Group.
  3. Click on the member in the Members list.
  4. Click the X next to their name to delete.

How to begin a Group conversation in Outlook

To start a conversation:
  1. Select the Group in the left navigation screen.
  2. Select the Home tab in the navigation ribbon.
  3. Select New Conversation in the New group.
  4. Compose your message.
  5. Click Send to generate an email to the rest of the group.
With conversations that you receive, you can also reply to the group or to the sender. You can also choose to like a message.

How to schedule group meetings in Outlook

To scheduling a meeting:
  1. Click the group in the left navigation screen.
  2. Click on Calendar in the navigation ribbon.
  3. Click New Meeting.
  4. Enter meeting details such as subject, location and the start or end times for the meeting.
  5. Enter any important details in the meeting section.
  6. Click Send.

Friday, 25 August 2017

How To Port Your Mobile Number?


If you want to port your number, then we have come to you the easiest way, in which you can go to another telecom company without changing your number.
For this, you have to do a small task, so you can easily take advantage of the port service. If you are using SIM of Airtel, Vodafone, Idea, BSNL or other telecom service users then mobile numbers can port number through portability.
To convert your SIM to Jio Sim, you first need to go to your message box and write to 1900. After which you will receive an SMS from your mobile number with the Unique Port Code 1901 number. This is valid for 15 days.
With this code, with your ID proof and passport size photo, you will now have to go to the store of the company you want to get a new SIM and get the Customer Acquisition Form (CAF) & Porting Form.
You will have to pay 19 rupees for this. In this form, you will also have to fill in other information along with the UPC Code. After 1 day you will receive the message of porting confirmation. Your number will be ported between 7 working days, after which you can use the new SIM.

How To Enable Google Phone Dialer Floating Bubble Without Root

If you spend long hours on your phone attending or making calls while checking stuff on your phone simultaneously, a floating bubble to manage your ongoing call can save you some trouble switching back and forth between the calling screen and your phone.
Google just added such bubble to its Dialer that works seamlessly. The bubble shows on your phone automatically when you place a call and implodes when the call ends.
Also Read: How to Install Same App Twice On Any Android Phone Without Root
What Does Google Dialer Floating Bubble do?
The floating bubble appears when you make a call and switch back to the home screen. You can tap it to access three controls – loudspeaker, call mute or end a call. You can also double tap the Bubble to switch to the main Dialer call screen.
Google has still kept the feature in the testing phase but good folks at XDA have managed to release a patched APK that would work on all Android phones. Here is how you can activate Google Dialer with Bubble mode.
Step 1: Download the Patched APK from here (V11.0.164102751)
Step 2: Install the Apk file on your phone (Settings>> security>> check box next to unknown sources. Tap on the file after downloading it or in the file explorer)
Step 3: Go to the Google Dialer (Phone app) App info page and give it permission to Draw over other apps.
Step 4: Set Google’s Phone dialer as your default dialer and you are good to go.
Also Read: How To Place Brightness Slider Anywhere On Status Bar [Without Root]
Active Google Phone Dialer Bubble Mode
Many manufacturers are now resorting to using stock Android OS and on all such phones, Google’s own Phone app is the default dialer. The Bubble mode won’t be life changing but it’s indeed a thing most of us could use every now and then. Besides, it works seamlessly without you even noticing it’s there most of the time.

4 Apps for Photography in Android Smartphone

Are you fond of photography? Do you like to take your time for photography? In such a situation, our news may come to you. Often, while ph...